Toni Weve1962

Should I Bring Snowboard Gear to a Hostel

Tabular array of Contents

17 Top Snowboarding Packing List Items for 2022 + What NOT to Bring

Man snowboarding

seen in: national geographic, cnn, travel + leisure, new york times

the guardian, lonely planet, usa today, forbes

There's no improve fashion to make the most of winter than hitting the slopes! Whether yous'll be taking it easy on the bunny hills or flying down the more advanced runs, being prepared is key.

Check out this list of my 17 snowboard trip must-haves and make sure yous don't forget a thing!

One affair to go on in mind is that you lot'll be likely going to a significantly higher elevation than you're used to so be sure to drink a ton of water and take it like shooting fish in a barrel if you're feeling any kind of altitude sickness when you offset go far. Also first taking this Chloroxogen distance medicine at to the lowest degree a week before you go.

Asher Fergusson snowboarding in Santa Fe, New Mexico
Me snowboarding in Santa Atomic number 26, New Mexico

What to Pack for Snowboarding – 17 Essentials

  • i. Cervix Wallet

    You'll be happy yous brought your handy neck wallet when y'all hit the lodge later on a long day out on the slopes. Large plenty to hold your telephone, wallet, passport, and whatever other necessity, wear this neck wallet under your dress to keep your valuables organized and secure until you demand them. The last thing yous want is your smartphone or wallet falling out of your pocket when you lot're riding upwards the chairlift!

    Neck Wallet

    View on Amazon.com ➜

  • ii. Snowboard

    This one is a no-brainer. Obviously yous need a snowboard to go snowboarding. I bet y'all didn't know you could detect a high quality one on Amazon, though. This i has crawly reviews and isn't too expensive, and comes with the bindings and boots too! Also consider bringing a snowboard lock to proceed your board secure when y'all break for drinks and snacks in the guild.

    Snowboard

    View on Amazon.com ➜

  • iii. Snowboard Bag

    Of form, you're going to need a pocketbook to send all of your gear. The awkward shape of much of your stuff definitely calls for a specialized snowboard handbag like this one, that can fit all your gear and is extremely durable.

    Snowboard Bag

    View on Amazon.com ➜

  • 4. Packing Cubes

    Packing cubes are a travel must-take, no matter where yous're going or for how long. These will help you to stay organized and non overpack, which volition be a godsend when you're lugging all your snowboarding gear. This set of packing cubes is awesome because it comes with an extra pocketbook for your shoes and another for dirty laundry.

    cube

    View on Amazon.com ➜

  • 5. Lipstick-Size Portable Charger

    Finally, a lipstick-sized portable charger is an invaluable item to bring with you on your snowboarding trip. Whether you lot're using your phone for photos, videos, music, or navigation, yous won't want to get stuck if your phone dies out on the slopes. Stick this small portable charger in your pocket and recharge your smartphone as necessary throughout the day without having to stop for a interruption in the club.

    charger

    View on Amazon.com ➜

  • 6. Virtual Individual Network (VPN)

    A VPN is an underratedly important thing to take whenever you're traveling and connecting to public WiFi. In remote ski resorts or mountain lodges where cellular information is spotty, you lot'll probable need to connect to the WiFi which means y'all'll exist vulnerable to potential hackers. Using a VPN will keep your individual information secure, so you won't have to worry most your passwords and credit carte du jour numbers getting compromised. A VPN will also grant you admission to sites that may be blocked or censored in the country you're visiting.

    vpn

    View NordVPN.com Options ➜

  • 7. Waterproof Snow Pants

    The last affair y'all'll want to worry about on your snowboarding holiday is wet pants! You lot can't help exposing your clothing to the snow and water ice, so having waterproof pants is primal. These snow pants are highly rated and extremely insulated, yet breathable. I find information technology helpful to purchase pants in colors that won't evidence dirt or marks (gray, brown or dark blue), since you lot'll likely be getting pretty roughed up while snowboarding.

    Waterproof Snow Pants

    View on Amazon.com ➜

  • 8. Altitude Sickness Medication

    You may not realize it before you caput out there, merely snowboarding at high altitudes can really have a significant effect on your body. Be prepared to fight distance sickness with this medication that uses all natural ingredients. We never hit the slopes without it!

    Altitude Sickness Medication

    View on Amazon.com ➜

  • nine. Warm Hat

    Did you know that a lot of your trunk heat is lost through your head? Go along that heat in and regulate your overall body temperature by wearing a warm chapeau. This beanie is perfect for slipping on under your ski mask, and is a good culling to earmuffs. You lot'll have loads more fun when you're comfortable and at a good body temp.

    Warm Hat

    View on Amazon.com ➜

  • 10. Long Underwear

    This is an of import base layer of your snowboarding outfit. Make sure that the long underwear yous purchase fits properly, not too loose or besides tight. These ones are sweat-wicking, insulating and ultra comfy.

    Long Underwear

    View on Amazon.com ➜

  • 11. Travel Insurance for Snowboarding Trips

    You won't regret having travel insurance when y'all exit for your snowboarding trip, even if it's just for peace of mind. Especially if you're traveling overseas, you'll want to make sure you lot're covered. We love using TravelInsurance.com any time we travel considering they allow you to compare great plans that encompass the costs for lost or stolen luggage, flight cancellations, and medical expenses in the case of an blow on the slopes.

    travelinsurance.com

    Compare policies at TravelInsurance.com ➜

  • 12. Buff / Neck Warmer

    A buff is another proper noun for a neck warmer and muffler combo. It can likewise exist used as a headband or sweatband. Buffs are super multipurpose and very handy while snowboarding. Employ it to keep warm and protected from the wind while you're cruising down the slopes.

    Buff / Neck Warmer

    View on Amazon.com ➜

  • 13. Universal Power Adapter

    Don't get stuck without a style to plug in and accuse up your electronics when you get to the mount. Specially if you're headed on a snowboarding trip abroad, you tin't become wrong with packing a universal power adapter. This one works almost everywhere in the world and includes USB ports so you can plug in multiple devices at in one case.

    Power Adaptor

    View on Amazon.com ➜

  • 14. Snow Boots

    For those occasions during your snowboarding trip in which you are not on the hills, information technology's handy to have some trendy, warm snowfall boots with you lot. Skid these white ones on with whatever outfit and feel similar a bona fide snowfall bunny!

    Snow Boots

    View on Amazon.com ➜

  • xv. Waterproof Socks

    Skilful socks are vital to any enjoyable snow experience. Snowboarding in socks that absorb water volition leave you common cold and blistered at the end of the day. Stick with waterproof socks. You can wash them after a solar day of snowboarding, hang them to dry in your hotel room, and they'll be ready to go the side by side day. These ones are breathable, waterproof and perfect for a day in the snow.

    Waterproof Socks

    View on Amazon.com ➜

  • xvi. Affordable Underwater Camera

    Even if y'all're only a beginner, a snowboarding trip almost guarantees awesome views! Bring an affordable waterproof camera to capture all the incredible moments set in your snowy wonderland. In that location are special attachments you lot tin get to link the camera to your helmet for first-person action footage. When yous get home you lot'll love beingness able to go back in time and relive your favorite moments!

    underwater camera

    View on Amazon.com ➜

  • 17. Gloves

    Gloves are one of the nearly of import things you'll exist bringing on your trip to the slopes. Make sure you get wintertime sport-specific gloves so that your easily don't overheat, but even so stay protected from the wind and snow. These ones piece of work peachy for snowboarding.

    Gloves

    View on Amazon.com ➜

What to Wear in Snowboarding

Layering is cardinal when dressing for a day of snowboarding. Kickoff with your base layers of thermal underwear and a synthetic long sleeve shirt. Your mid-layer is your insulating layer. Information technology should be a soft-shell (or fleece) jacket or pullover. Your side by side layer is your protective layer including your snowfall pants. They should be waterproof, and current of air resistant. Make sure you habiliment your waterproof socks, and peradventure constrict an extra pair into your snowboard bag in case water or snowfall gets within your socks. Gloves are very important too. Don't forget your goggles, vitrify and whatsoever other accessories you lot want to wearable.

What NOT to brings Snowboarding

  • 1.Scarf

    A buff is a much more logical particular of snow-vesture. An ordinary scarf runs the risk of flying off of your neck. A buff tin can exist a scarf, a face guard, a headband, or a sweatband.

  • 2.Cotton fiber vesture or socks

    Cotton absorbs h2o and sweat easily, and and then takes forever to dry. In freezing temperatures this is highly dangerous, and even puts you at take chances for hypothermia. Opt for synthetic fabrics that are marketed every bit quick-dry or sweat-wicking.

  • 3.Dressy clothes

    Ski towns are very laid back. Subsequently skiing or snowboarding nearly people go out for dinner or a beer in their ski clothes! If you're in a nicer place like Aspen, CO, though, and are planning on having a fancier dark out, go alee and bring some nicer clothes.

  • iv.Jewelry

    Like I said before, most ski towns are relatively laid back. Leave the jewelry at home unless y'all have a special occasion planned!

  • 5.Lots of electronics

    Definitely bring your camera, GoPro and iPhone, but possibly consider taking this trip as on opportunity to disconnect. Leave the computer and tablet behind!

FAQs about Traveling in Snowboarding

  • ane. Should I bring my ain gear or hire?

    If yous take your own gear, by all means bring information technology (especially if y'all're driving and have the space)! If not, or if it'south more than economical to but rent your gear there, opt for that instead. Research prices for your specific destination online before deciding one way or another.

  • 2. What types of lodging options are available?

    There are usually ski resorts, lodges and motel options bachelor in ski towns in the Us! It's always a good idea to bank check Airbnb for some better deals and a more local experience.

  • 3. What if snowboarding is not my thing, but I still desire to become?

    Some people prefer the warm temper of the lodge to the actual skiing. In that location are probably many different festive activities to engage in at your order or in the town you're in. Plenty of people can be found cozying upwardly to a adept volume by the fire of bonding over cider. A snowy getaway tin be just every bit fun without hitting the slopes!

  • 4. What other activities tin I bask on a ski trip besides skiing?

    Check online before you go. There could be snowboarding, sledding, ice sculpting competitions, and so much more. The sky's the limit!

DOWNLOAD HERE

Should I Bring Snowboard Gear to a Hostel UPDATED

Posted by: toniweve1962.blogspot.com

Should I Bring Snowboard Gear to a Hostel UPDATED. There are any Should I Bring Snowboard Gear to a Hostel UPDATED in here.

Download Article

Download Commodity

Making your own Santa hat is like shooting fish in a barrel and it volition exist a lot better in quality than the ones sold past the dollar store. The most traditional lid is fabricated out of velvet or faux fur, but you can brand simpler ones out of paper. You lot can even brand a mini Santa lid headband!

  1. one

    Carve up your head circumference by 2. Take a measuring tape and wrap information technology around your caput where you want the hat to sit. Take the measuring tape off, note your measurement, and then dissever it by 2.[one]

    • For instance, if your caput circumference is 22 inches (56 cm), then your new measurement is 11 inches (28 cm).
    • If yous do not accept a measuring tape, wrap a piece of cord around your caput, and then concur it against a ruler.
  2. 2

    Draw a triangle on a sheet of paper based on your new measurement. The base of operations of the triangle should exist half of your caput circumference. The height of the triangle should be whatsoever height you want the hat to exist.[ii]

    • Drape a measuring record across the height of your caput. Make up one's mind where you want the tip of the lid to hang, and then utilize that measurement for the height.
    • For an adult chapeau, brand it about xiv inches (36 cm) tall. For a child'due south hat, make it about 13 inches (33 cm) tall. Only information technology also depends on a person'southward height. [three]

    Advertizing

  3. iii

    Draw a curve along the bottom border of the triangle. Tie a pencil to a piece of string. Hold the finish of the string at the tip of the triangle, so place the pencil at the bottom left corner of the triangle. Belongings the string taut, swing the pencil towards the lesser right corner of the triangle, creating an arch.[iv]

    • You can also use a pen or marker instead of a pencil. If you lot accept a compass, you tin can use that, besides.
    • The bend needs to first at 1 corner and cease at the other. Y'all want to end up with a triangle with a curved lesser.
    • You can draw the curve by hand instead. It won't be as swell or precise, but it will do.
  4. iv

    Cut your design out, then trace it onto a piece of folded textile. Fold a canvas of red fabric in half with the wrong side facing out. Place the design on top of the fabric, with ane of the triangle's diagonal edges along the fold. Trace the triangle with a tailor'due south chalk or pen.[5]

    • Dandy fabrics to utilise include: faux fur, velvet, fleece, flannel, and felt.
    • Brand certain that you are cut along the curved line and so that the triangle has a curved bottom edge and non a straight edge.
  5. five

    Cutting the pattern out adding a 12  in (ane.3 cm) seam allowance. Because 1 of the diagonal edges is already forth the fold, you simply need to add together seam allowances to the bottom curved edge and the other diagonal edge. This is important. If y'all do not add seam allowances, the lid will plow out too modest.[6]

  6. 6

    Run up the border using a straight sew together and a 1two  in (1.3 cm) seam allowance. Beginning at the bottom of the triangle and finish at the top. Match the thread colour to the textile equally closely as possible. If you need to, use sewing pins to hold the triangle together, but call back to have them out when you are done.

    • Information technology will be faster to do this on a sewing motorcar, only you can exercise it past hand. If you are using a sewing machine, backstitch when you lot start and finish sewing and then that the stitches don't come undone.
    • If y'all don't know how to stitch, glue the seam together using hot glue or cloth glue.[7]
  7. vii

    Cut a strip of white faux fur for the trim. Cutting a strip of white fuzzy cloth one inch (two.five cm) longer than your head circumference. You need to make the strip twice as wide every bit you lot want the trim to be, plus 1ii inch (i.iii cm) for the seam allowance. For case, if yous want it to be 2 inches (5.1 cm) wide, cut information technology 4 ane2 inches (eleven cm) wide.[viii]

    • White fur is the most pop, but you tin utilize white felt or fleece as well.
    • If you lot aren't sewing the chapeau, brand the strip the same width that you want the trim to be. For case, if you want it to exist 2 inches (5.1 cm) wide, and so cut it ii inches (5.1 cm) wide.
  8. 8

    Stitch the ends of the fur with a straight stitch and a 12  in (1.3 cm) seam. Fold the fur trim in one-half with the wrong sides facing out. Make sure that the narrow edges friction match up, and so stitch across them using a straight stitch and a one2  in (one.three cm) seam assart. Employ white thread for this.

    • Again, you lot can do this past hand or on a sewing machine. If yous are using a sewing machine, remember to back run up.
    • Because of how curt the ends of the fur trim are, y'all shouldn't accept to use sewing pins. If you need to utilise them, however, think to pull them out when you are done.
  9. 9

    Slide the trim over the bottom of the lid and sew information technology in identify. Turn the hat correct-side-out, but keep the fur turned inside-out. Slide the trim over the lesser of the hat, and so sew forth the lesser border using a 12  in (1.three cm) seam allowance. Use white or reddish thread and a directly stitch.[9]

    • If yous don't know how to sew, turn the trim right-side-out and slide information technology over the lesser edge of the trim. Glue it downward with hot gum or textile glue.[10]
    • Brand sure that the side seam on the fur trim matches upwards with the side seam on the chapeau.
  10. x

    Fold the fur trim downward, then fold and stitch the raw edge into the hat. Keep the lid turned right-side-out. Pull the fur trim downwardly to reveal the right side. Fold the trim in half by tucking the bottom raw edge into the hat. Sew together the lesser raw edge to the inside seam. You can as well mucilage it to the inside of the chapeau instead.[11]

    • Skip this step if you lot glued the fur trim down.
    • Y'all tin stitch the fur by mitt or on a sewing motorcar with a straight stitch. If you are using a sewing motorcar, call back to backstitch.
  11. 11

    Sew or mucilage a pompom to the tip. Buy a large pompom from the kids crafting section of a arts and crafts shop. Secure it to the tip of your hat with hot gum or fabric glue; yous can likewise run up it to the tip of the chapeau by paw.[12]

    • If you can't observe whatever pompoms, you lot can employ a white cotton ball instead.
  12. 12

    Brand a fur pompom for a fancier hat. Employ a drinking glass to trace a iii in (vii.half-dozen cm) circle on a piece of white fur, so cut the circle out. Hand sew a straight or running stitch around the edges of the circle. Pull on the thread to gather the edges of the material and grade a ball. Knot the thread, then sew or glue the ball to the chapeau.[13]

    • You should either run up/glue a pompom or make a fur ball. Don't practise both.

    Advertisement

  1. ane

    Describe an 20 in (51 cm) wide semicircle on a sheet of red paper. Identify a ruler along the bottom edge of your paper. Tie a pencil to a piece of string, so hold the cease of the string against the paper at the ten in (25 cm) marker. Hold the string taut and employ the pencil to depict an arc from the one in (2.5 cm) mark to the 20 in (51 cm) mark.[xiv]

    • You lot tin make a smaller hat by making information technology 18 inches (46 cm) wide instead.
  2. 2

    Cut the semicircle out with scissors. If you see whatever pencil marks, utilise an eraser to get rid of them. If you want to brand a fancier felt hat, use the semicircle you but cut out to trace and cut another semicircle out of red felt.[15]

  3. 3

    Overlap the straight edges of the semicircle to make a cone. How much you overlap the direct edges depends on how big you need the hat to be. The more y'all overlap, the smaller the hat will plough out.[16]

    • Examination the chapeau against your head to see if information technology is the correct size. Tighten or loosen the hat equally needed.
  4. iv

    Staple or gum the chapeau shut. Once you are happy with the fit, take the hat off. Use a stapler to staple the seam of the chapeau down. You volition need 1 staple near the top of the hat and 1 staple near the bottom. For a nicer cease, you tin can use mucilage or fifty-fifty a strip of double-sided record.[17]

    • You can use tacky glue, white school gum, or a gum stick, but you volition demand to pin the hat together while the glue dries. This can take anywhere from 15 to 20 minutes to a few hours.
  5. 5

    Glue cotton balls around the bottom edge of the hat. Tacky mucilage or white school glue will work just fine for this, but you tin can utilize a hot gum gun too. Glue the cotton balls close together so that you don't see whatsoever gaps.[xviii]

    • Don't use white pompoms; they won't give y'all the right look.
    • If you lot can't find cotton wool assurance, cut a strip out of white felt, and use that instead.
  6. half dozen

    Glue a white cotton ball or a white pompom to the superlative of the hat. Place a large drop of hot glue, tacky glue, or white school glue on meridian of your lid. Next, press a white pompom or a cotton ball into the mucilage. Await for the glue to dry earlier wearing the chapeau.[19]

    • Hot glue will ready within minutes. Tacky glue or white school glue volition accept a few hours.

    Advertizement

  1. 1

    Depict a semicircle on a sail of red felt and cut it out. The semicircle needs to be twice every bit wide as you lot want your final chapeau to be. Something effectually vi to viii inches (xv to 20 cm) would be ideal; this volition requite you a cute chapeau that's about iii to 4 inches (vii.6 to 10.2 cm) tall.[20]

    • Alternatively, apply a bowl or plate to trace a full circumvolve. Cutting the circle out, and so cut the circumvolve in half.
    • Use red sparkly felt for a fancier affect!
  2. 2

    Overlap the straight edges of the semicircle to make a cone. How much you overlap the edges by does not actually matter equally long equally information technology is a cone shape. This hat will be likewise pocket-size to fit over your caput like a normal hat anyway; you will be placing it on top of a headband instead![21]

    • If you are using glittery felt, make certain that the glittery side is facing out.
  3. iii

    Hot glue the seams downwardly. One time yous are happy with the shape of your cone, pull the edge away and describe a line of hot gum down it. Apace printing the edge back confronting the cone, and hold it there until the glue sets. This should just take a few minutes.[22]

    • You lot can also use tacky gum or material gum, merely y'all'll have to pin the felt until the glue sets. Material glue will accept about 15 to twenty minutes while tacky glue volition have several hours.
  4. four

    Trace the base of operations of the cone onto red felt, so cut the circumvolve out. Place your cone on meridian of a sheet of matching carmine felt. Trace around the base of the cone using a marker, and then cutting the circle out. You will utilise this for the bottom of the cone so that you lot can adhere it to the headband.[23]

    • Cut just inside the lines that you lot drew, otherwise the circle will end up as well large.
  5. v

    Cut 2 slits into the red felt circle for the headband. Measure the width of your headband starting time. Next, cutting a vertical slit into the left side of your felt circle, about 12 inch (1.3 cm) from the edge. Cut another matching slit on the right side of the circle, likewise one2 inch (1.3 cm) from the border.[24]

    • Adding slits to the circumvolve will permit you to slide it around on the headband and change its position. It is better than just gluing it on.
  6. vi

    Glue the circle to the bottom of the cone. You tin do this with hot glue, tacky glue, or fabric mucilage. Identify the gum effectually the edges of the felt circle, so printing them confronting the within edges of the cone. You lot will have a slide seam along the inside edge, which is fine.[25]

    • If you are using hot glue, work 1 to 2 inches (2.v to 5.1 cm) at a time, or the glue volition set too fast.
    • If you lot are using fabric glue or tacky glue, pivot the felt while information technology dries.
    • If some of the circle sticks out from under the edge of the cone, trim it off.
  7. 7

    Cut a strip of white faux fur for the brim of your chapeau. Wrap a measuring tape effectually the base of operations of your cone to get the circumference, then cut a strip of white fur co-ordinate to that measurement. Make the fur strip most 1ii to one inch (1.3 to 2.5 cm) wide.[26]

    • You can discover white fur in the kids' crafting department of a craft store. If the fur is too long, cutting it shorter with pair of scissors.
    • If y'all can't find white fur, yous tin can use white felt instead.
  8. 8

    Glue the white fur strip to the lesser edge of your cone. You can do this with hot glue, material mucilage, or tacky glue. If y'all are using hot mucilage, clasp the mucilage out 1 to 2 inches (2.5 to 5.1 cm) at a time before pressing the fur into it. If you squeeze also much mucilage out at once, it will set before yous finish adding the fur.[27]

    • Again, if you utilise tacky glue or fabric glue, yous will demand to pin the fur until it sets.
  9. 9

    Glue a pompom to the acme of the hat. Buy a pack of minor white pompoms from the kids' crafting section of a craft store. Glue the pompom to the tip of the hat, so let the glue set. Hot glue volition work the best for this, but you lot can apply cloth gum too.[28]

    • Tacky glue is not recommended because it takes besides long to dry and the pompom may slide effectually equally it dries. Y'all won't take this issue with fabric glue because it is so thick and dries fast.
    • If you can't find pompoms, effort a cotton fiber ball instead.
  10. 10

    Slide the chapeau onto a headband through the slits. Button the finish of the headband into the left slit, and then go on pushing information technology until it comes out of the right slit. Slide the hat effectually on the headband into your desired position. You can get in sit right on top of the headband or at a slight bending.[29]

  11. 11

    Finished!

    Advertizement

Add New Question

  • Question

    Can I make a Christmas chapeau with glazed paper and cotton?

    Community Answer

    Aye, you may! Make a cone out of the paper, then add the cotton to the top for a Santa lid.

Ask a Question

200 characters left

Include your email address to become a message when this question is answered.

Submit

Ad

Video

  • Your Santa hat does not have to exist cerise and white.

  • Plow it into an elf hat by using green felt or fleece instead of blood-red, and carmine felt or fleece instead of simulated fur.

Thanks for submitting a tip for review!

Advertisement

Things Y'all'll Need

  • Red fabric (felt, fleece, fur, etc.)
  • White faux fur
  • Fabric scissors
  • Measuring tape
  • White pompom (optional)
  • Needle
  • White thread
  • Ruby-red thread
  • Sewing automobile
  • Sewing pins
  • Pencil
  • String
  • Scrap newspaper
  • Tailor'southward chalk or pen
  • Red paper
  • White cotton balls
  • Hot glue or tacky glue
  • Pencil
  • String
  • Ruddy felt
  • White faux fur
  • White pompoms
  • Hot mucilage
  • Headband
  • Pair of scissors
  • Marker

Near This Article

Thanks to all authors for creating a page that has been read 263,870 times.

Did this commodity help you?

DOWNLOAD HERE

How to Draw a Christmas Hat Step by Step TUTORIAL

Posted by: toniweve1962.blogspot.com

How to Draw a Christmas Hat Step by Step TUTORIAL. There are any How to Draw a Christmas Hat Step by Step TUTORIAL in here.

How to Draw a Bull

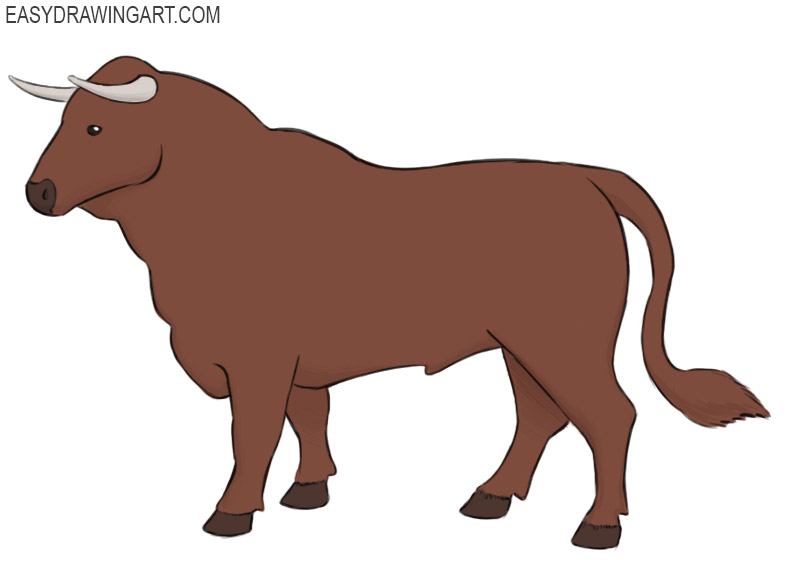
In this cartoon tutorial, we volition testify you how to draw a bull footstep by step. As ever, this will be a very elementary drawing lesson at the finish of which you will go a fairly realistic balderdash.

Before starting the lesson on how to draw a bull, it should be mentioned that almost all mammals are drawn in about the same way. For example, the process of drawing a bull differs little from the procedure of portraying a cat or a donkey.

Here nosotros will describe in every bit much detail as possible all the deportment that need to be washed to become a beautiful drawing of a bull. We will likewise requite you lot some tips to help make your balderdash drawing even more interesting.

How to Draw a Balderdash
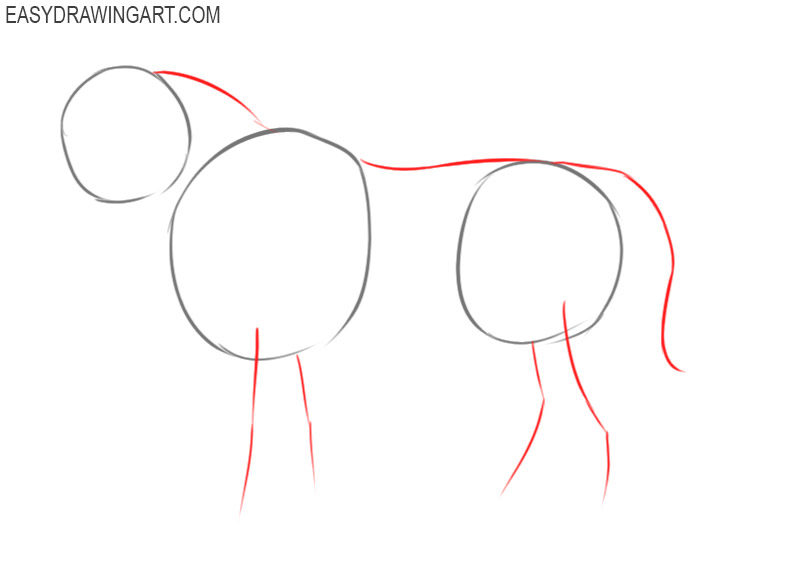
Stride i

Start cartoon the bull by sketching 3 circles. The smallest circle for the head, the largest circumvolve for the chest, and the smaller circle for the pelvis.

how to draw a angry bull

Pace 2

At present sketch the neck, spine, and tail with three simple lines. Next, sketch the limbs at the bottom. Very light, almost invisible lines should be used here.

how to draw a bull cow

Step 3

Now let'due south get down to the details. Get-go at the head by sketching the outlines of the muzzle. To bank check your drawing for mistakes, move abroad from it from time to time.

how to draw a cute bull

Stride 4

Draw a nose at the end of the muzzle. Draw a small eye on the head. Past the way, there is another manner to bank check your drawing for mistakes. Y'all can turn it upside down.

how to draw a bull easily

Step v

Describe the crown of the head with a minor arched line. Adjacent, using a long and wavy line, depict the bull'due south neck, which smoothly passes into the chest function.

how to draw a good bull

Footstep 6

Now get back to the bull'due south head and draw the horns pointing forward. It is this element that makes our bull recognizable.

how to draw a bull in steps

Step 7

Draw the front legs of the bull as shown in our example. When drawing the legs of the bull, be sure to depict thickenings in the area of the ligaments.

how to draw bull images

Step 8

At present draw the hooves at the lesser of the legs. As you can run across it is very simple. Each hoof is made upward of literally three simple lines.

steps on how to draw a bull

Step 9

At present draw the abdomen of the balderdash with a long line. Note that the torso is thicker in the chest area and narrower in the belly and pelvis.

how to draw a bull simple

Step x

Describe the hind legs. They are drawn in much the same way as the front legs. It is too very of import here to correctly describe all the bends and bumps on the legs.

bull drawing easy

Step xi

And again nosotros draw the hooves, just this time on the hind legs. They are exactly the same simple and in the same manner, consist of iii lines.
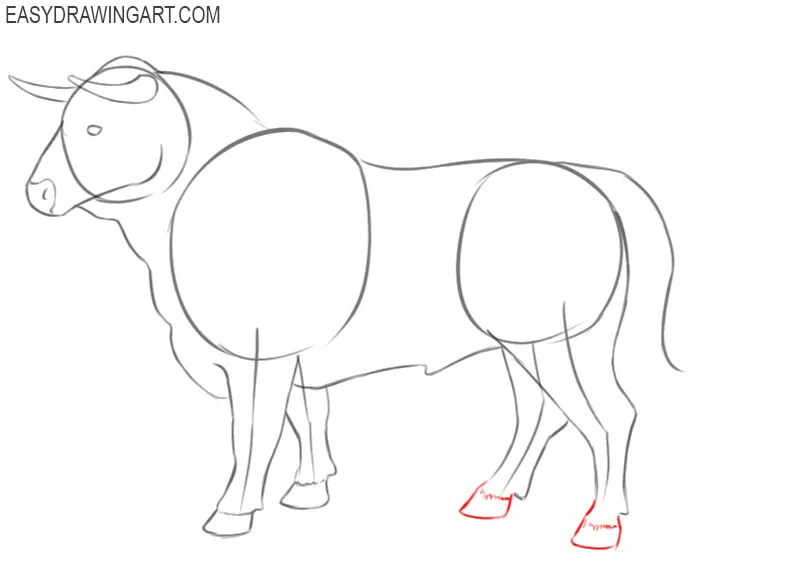
bull drawing easy step by step

Step 12

Apply a long, curved line to complete drawing the tail. At the tip of the tail, draw a tuft, equally shown in the example from the artists of Easydrawingart.com.

bull drawing images

Step 13

Set aside the pencil and accept an eraser. Carefully erase all the guidelines drawn in the first steps. To make your bull drawing more expressive, outline it with a dark pencil or liner.
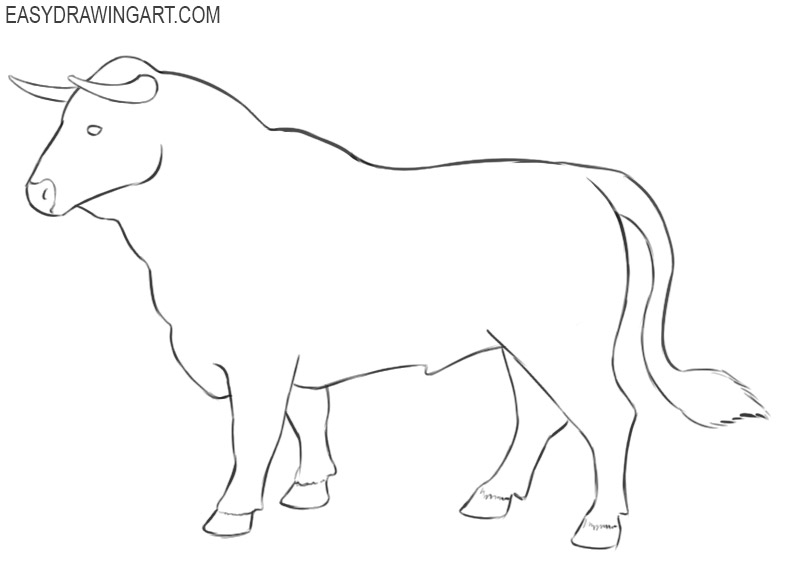
bull drawing cartoon

Footstep 14

Nosotros decided to use brown for the skin of the bull, dark brownish for the nose and hooves, blackness for the eyes, and biscuit for the horns.

How to Draw a Bull

Every bit we said at the very starting time of this article, you can make your drawing of the bull more than interesting.

For example, y'all can try to depict a field, mountains, and trees in the background. This will position the bull in its natural habitat.

You tin also use more shadows to requite your drawing a more than voluminous and realistic look.

DOWNLOAD HERE

How to Draw a Bull Head Step by Step TUTORIAL

Posted by: toniweve1962.blogspot.com

How to Draw a Bull Head Step by Step TUTORIAL. There are any How to Draw a Bull Head Step by Step TUTORIAL in here.